 강아지와 수의사 놀이를 하고 계신가요?
 싸움에서 다치거나 차에 치인 개를 본 적이 있습니까? 아마도 당신은 고개를 떨구고 떠날 수 밖에 없었을 것입니다. 신경쓰지 않아서가 아니라, 개에게 다가가서 검사하는 방법이나 다음에 해야 할 일을 몰랐기 때문입니다. 특히 자신의 개가 있는 경우 비상 상황에서 개가 도움을 요청하기 때문에 대비하는 것이 좋습니다.
이 기사는 자신 있게 응급처치를 하고 애완동물의 생명을 구하는 데 필요한 정보와 기술을 제공합니다. CPR 시행부터 벌레 물린 치료에 이르기까지 광범위한 개 응급 상황에 대처하는 방법을 배우게 됩니다.
대부분의 개의 부상을 치료하는 첫 번째 업무가 될 것이기 때문에 다치고 겁에 질린 개를 적절하게 제지하는 방법을 배우는 것으로 시작하겠습니다.
부상당한 개는 일반적으로 겁을 먹고 고통을 느끼며, 당신의 존재가 매우 안전하다고 느끼지 않는 한 도망치거나 당신을 물 수도 있습니다. 따라서 다친 개에게 접근할 때 다음 팁을 사용하는 것이 중요합니다.
1단계: 차분한 어조로 개에게 천천히 다가가십시오.
2단계: 개를 만지지 말고 가까이 이동하십시오.
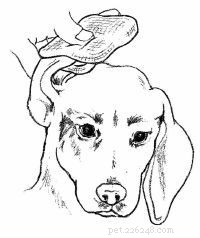
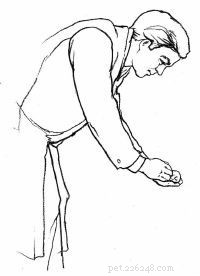
3단계: 개에게 몸을 굽혀라. 계속 말하면서 눈과 표정을 관찰하십시오.
3a단계: 개가 눈을 크게 뜨고 으르렁거리면 쓰다듬지 마십시오. 4단계로 진행합니다.
3b단계: 개가 머리를 숙이고 입에 "웃는" 모습으로 떨고 있다면 먼저 턱 아래를 쓰다듬어 안심시키십시오. 허용되는 경우 강아지의 머리를 쓰다듬어 주세요.
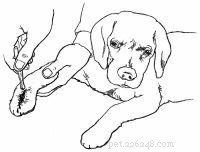
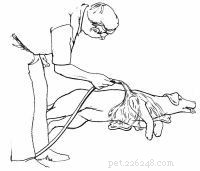
4단계: 강아지 목에 가죽끈을 매십시오. 로프, 넥타이, 벨트 또는 찢어진 헝겊 등 가능한 모든 재료를 사용하십시오.
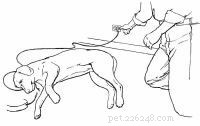
5단계: 혼자라면 울타리 기둥과 같은 고정된 물체 주위에 목줄을 두십시오. 개를 이 물체에 대고 당기고 개가 머리를 움직일 수 없도록 목줄을 묶습니다.
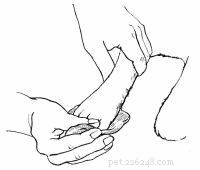
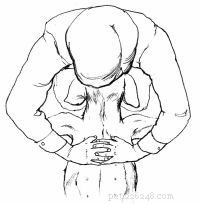
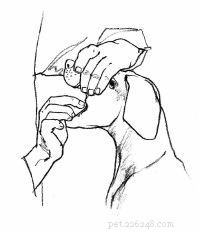
6단계: 자신을 보호하기 위해 개에 입마개를 씌워주세요.
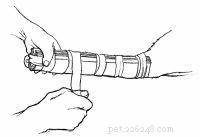
6a단계: 긴 로프 조각, 찢어진 헝겊 또는 넥타이를 사용하여 개의 총구를 고리로 묶고 턱 아래에 단일 매듭을 묶습니다.
6b단계: 로프, 헝겊 또는 넥타이의 끝을 귀 뒤로 가져와 활로 묶습니다.
7단계: 혼자라면 치료를 진행하십시오.
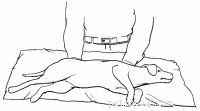
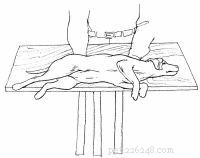
8단계: 가능하면 개를 테이블이나 다른 위로 올려진 표면에 놓으십시오.
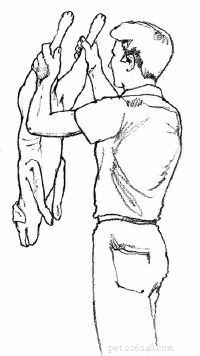
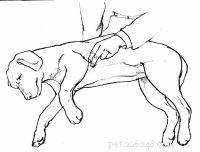
8a단계: 개가 작으면 한 손으로 목줄을 잡고 다른 팔로 강아지의 등을 감싸고 몸을 감쌉니다. 동시에 목줄을 앞으로 당기고 강아지의 몸을 들어 올려 당신의 몸에 기대어 주세요.
8b단계: 개가 크면 한쪽 팔을 목 아래로 밀어넣고 목구멍을 팔 안쪽으로 잡습니다. 개가 쉽게 숨을 쉴 수 있는지 확인하십시오. 다른 쪽 팔을 개의 배 아래에 놓습니다. 두 팔로 들어올립니다.
8c단계: 개가 매우 크면 한쪽 팔을 목 아래로 밀어넣고 가슴을 팔 안쪽으로 고정합니다. 개가 쉽게 숨을 쉴 수 있는지 확인하십시오. 다른 쪽 팔을 개의 엉덩이 아래에 놓고 두 팔을 서로를 향해 누르면서 개를 들어 올리세요.
8d단계: 당신이 테이블에 개를 안고 있는 동안 보조자가 치료를 관리하도록 하십시오.
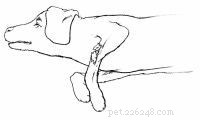
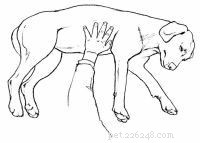
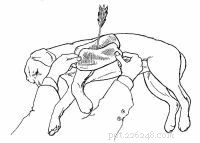
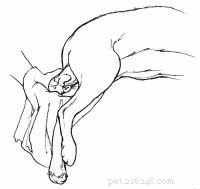
9단계: 강아지를 옆으로 눕히고 싶다면:
9a단계: 서거나 무릎을 꿇고 개가 머리를 오른쪽으로 향하도록 합니다.
9b단계: 개의 등 위로 손을 뻗어 오른손으로 가장 가까운 앞다리를 왼손으로 가장 가까운 뒷다리를 잡습니다.
9c단계: 개의 다리를 몸에서 멀리 밀고 개를 몸 아래로 밀어 넣습니다.
9d단계: 오른손으로 앞다리, 왼손으로 뒷다리를 잡습니다.
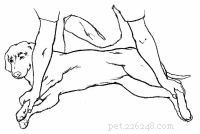
9e단계: 오른팔로 개의 목을 부드럽게 잡습니다.
9f단계: 보조자가 치료를 관리하도록 하십시오.
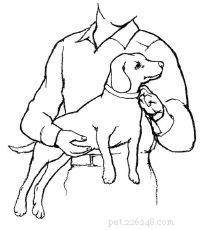
10단계: 강아지를 앉히고 싶다면:
10a단계: 한쪽 팔을 강아지 목 아래로 밀어넣고 목구멍을 당신의 팔 굽이에 대십시오. 개가 쉽게 숨을 쉴 수 있는지 확인하십시오.
10b단계: 다른 팔로 개의 등과 배를 감싸십시오.
10c단계: 강아지를 몸에 대고 누르면서 강아지의 뒷부분에 체중을 가합니다.
10d단계: 보조자가 치료를 관리하도록 하십시오.
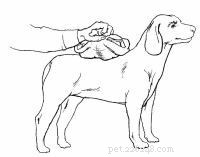
11단계: 개가 서 있기를 원하는 경우:
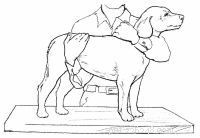
11a단계: 한쪽 팔을 강아지 목 아래로 밀어넣고 목구멍을 당신의 팔 굽이에 대십시오. 개가 쉽게 숨을 쉴 수 있는지 확인하십시오.
11b단계: 다른 쪽 팔은 개의 배 아래에 놓습니다.
11c단계: 개를 몸쪽으로 누르고 위로 들어 올리세요.
11d단계: 보조자가 치료를 관리하도록 하십시오.
개를 제지하는 방법을 배우는 것은 거의 모든 애완동물 응급 상황에서 도움이 될 것입니다. 이제 다친 개를 수의사에게 이송하는 방법을 살펴보겠습니다.
구급 상자 필수품애완동물 주인은 강아지 응급 상황에 대비하여 다음 품목을 준비해야 합니다.
더 읽어보기
다친 개를 제지했다면 가능한 한 빨리 수의사에게 데려가야 합니다. 다친 개를 필요 이상으로 움직이지 않도록 하고 누군가가 수의사에게 전화하여 도착할 준비가 되었는지 확인하게 하십시오. 그 동안 다음 팁을 사용하여 최대한 주의하여 반려동물을 운송하세요.
1단계: 개가 작은 경우:
1a단계: 한 손으로 칼라를 잡고 다른 팔로 등을 감싸고 몸을 감쌉니다.
1b단계: 동시에 목줄을 앞으로 당기고 강아지의 몸을 들어 올려 당신의 몸에 기대어 주세요.
2단계: 개가 큰 경우:
2a단계: 한쪽 팔을 목 아래로 밀어넣고 목구멍을 팔의 구부러진 부분에 고정합니다. 개가 쉽게 숨을 쉴 수 있는지 확인하십시오.
2b단계: 다른 쪽 팔을 개의 배 아래에 놓습니다. 두 팔로 들어올립니다.
3단계: 개가 매우 크면 한쪽 팔을 목 아래로 밀어넣고 가슴을 팔 안쪽으로 고정합니다. 개가 쉽게 숨을 쉴 수 있는지 확인하십시오. 다른 쪽 팔을 개의 엉덩이 아래에 놓고 두 팔을 서로를 향해 누르면서 개를 들어 올리세요.
4단계: 개를 수의사에게 옮깁니다.
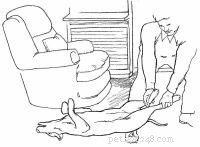
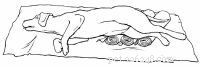
척추 골절이 의심되는 경우 평판을 사용해야 합니다.
1단계: 담요나 평판을 들것으로 사용하십시오. 보드를 사용하는 경우 2단계로 진행합니다. 담요를 사용하는 경우:
1a단계: 한 손은 개의 가슴 아래에 다른 손은 등 뒤에 놓습니다. 조심스럽게 개를 들어 올리거나 담요 위로 밀어 넣습니다.
1b단계: 개를 수의사에게 옮깁니다.
2단계: 평판을 사용하는 경우:
2a단계: 강아지의 크기에 따라 상판, 다리미판, 큰 도마, 이동식 책장 등을 이용하세요. 사용하는 모든 것이 차에 맞는지 확인하십시오.
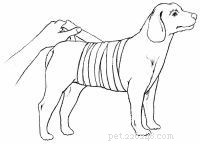
2b단계: 개의 목이 놓이는 부분을 피하면서 2~3개의 긴 천이나 밧줄을 보드 아래에 등거리로 놓습니다.
2c단계: 한 손은 개의 가슴 아래에 다른 손은 등 뒤에 놓습니다. 조심스럽게 개를 들어 올리거나 보드에 밀어 넣습니다.
2d단계: 개를 보드에 묶으세요.
2e단계: 개를 수의사에게 옮깁니다.
많은 응급 처치 상황에서 유용할 수 있는 또 다른 기술은 애완 동물에게 경구 약물을 투여하는 것입니다. 다음 페이지에서 약물 투여에 대한 몇 가지 유용한 정보를 확인하십시오.
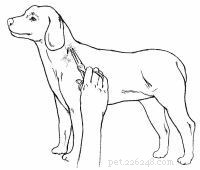
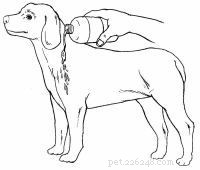
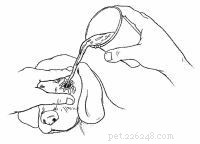
심각한 부상 후 진통제를 투여해야 하거나 애완 동물의 월간 심장사상충 약을 먹을 때인지 여부에 관계없이 개에게 경구 약물을 쉽게 제공하는 방법을 배우는 것은 도움이 되는 요령입니다. 다음 팁을 사용하여 개에게 액체 또는 알약을 제공할 수 있습니다.
1단계: 개를 제지하십시오. 개가 다루기 어렵다면 이를 제지하는 데 도움이 필요할 수 있습니다.
1a단계: 조용하고 안심시키는 말을 하여 개의 불안을 덜어주세요.
1b단계: 한쪽 팔을 개의 목 아래로 밀어넣고 목구멍을 팔에 부드럽게 대십시오. 개가 쉽게 숨을 쉴 수 있는지 확인하십시오.
1c단계: 다른 쪽 팔을 개의 가운데 위나 아래로 통과시키십시오. 부드럽지만 확고한 압력을 가하여 강아지의 몸을 당신의 몸에 붙이십시오.
1d단계: 필요한 경우 턱이 약간만 움직이도록 마우스 타이를 느슨하게 적용합니다.
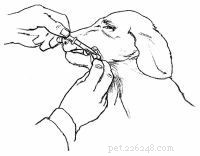
2단계: 개의 머리를 뒤로 살짝 기울이십시오.
3단계: 강아지 아랫입술을 모서리에서 잡아당겨 주머니를 만들어주세요.
4단계: 플라스틱 스포이드 또는 용량 주사기를 사용하여 액체를 파우치에 한 번에 조금씩 넣고, 더 이상 용량을 제공하기 전에 각각의 소량을 삼킬 수 있도록 합니다.
5단계: 강아지의 목을 부드럽게 문질러 삼키도록 자극합니다.
1단계: 개를 제지하십시오. 개가 다루기 어렵다면 이를 제지하는 데 도움이 필요할 수 있습니다.
1a단계: 조용하고 안심시키는 말을 하여 개의 불안을 덜어주세요.
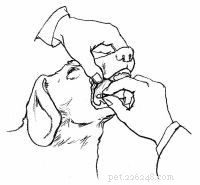
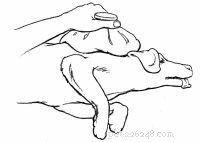
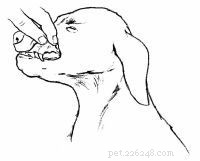
2단계: 한 손으로 총구 위로 개의 윗턱을 잡습니다.
3단계: 강아지의 입술이 치아와 손가락 사이에 오도록 한 쪽은 엄지손가락으로 다른 쪽은 손가락으로 눌러 윗니 위로 개의 입술을 누릅니다. 입을 벌리도록 강한 압력을 가하세요.
4단계: 다른 손의 엄지와 검지 사이에 알약을 잡고 가능한 한 개의 입 안쪽으로 알약을 넣습니다.
5단계: 강아지의 목을 부드럽게 문질러 삼키도록 자극합니다.
다른 방법은 치즈, 땅콩 버터 또는 기타 맛있는 간식에 알약을 숨기는 것입니다.
개의 혈액은 심각한 부상의 징후이거나 발에 약간의 흠집일 수 있습니다. 다음 섹션에서는 다양한 징후를 발견하는 방법과 출혈하는 애완동물을 돕기 위해 해야 할 일에 대해 논의할 것입니다.
개의 발과 다리는 깨진 유리, 못, 기타 날카로운 물건으로 인한 부상에 취약하며 잘리면 심하게 피가 납니다. 귀를 덮는 피부가 너무 얇기 때문에 부상당한 귀도 심하게 피를 흘릴 것입니다.
출혈 손상이 있는 경우 응급 처치의 주요 목적은 쇼크로 이어질 수 있는 과도한 출혈을 예방하는 것입니다. 쇼크의 징후로는 창백하거나 하얀 잇몸, 빠른 심장 박동 또는 빠른 호흡이 있습니다. 상처에서 피가 뿜어져 나오면 동맥이 잘렸다는 뜻입니다. 즉각적인 전문가의 주의가 필요합니다.
개를 돌보는 방법은 출혈의 위치와 정도에 따라 다릅니다. 다음의 개 관리 요령은 다양한 신체 부위에 응급 처치를 적용하는 데 도움이 될 것입니다.
1단계: 필요한 경우 개를 제지하십시오.
1a단계: 차분한 어조로 개에게 천천히 다가가십시오.
1b단계: 개의 목에 가죽끈을 걸고 고정된 물체 주위에 가죽끈을 두십시오. 개를 이 물체에 대고 당기고 개가 머리를 움직일 수 없도록 목줄을 묶습니다.
1c단계: 자신을 보호하기 위해 개에 입마개를 씌워주세요.
2단계: 멸균 거즈 패드, 깨끗한 접힌 수건 또는 생리대 등으로 상처를 덮습니다.
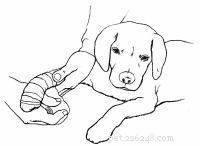
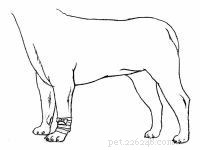
3단계: 찢어진 헝겊이나 기타 부드러운 재료를 드레싱 주위에 감싸고 붕대가 제자리에 고정될 수 있을 만큼만 단단히 묶거나 테이프로 감습니다.
4단계: 개를 즉시 수의사에게 옮깁니다.
1단계: 필요한 경우 개를 제지하십시오.
1a단계: 차분한 어조로 개에게 천천히 다가가십시오.
2단계: 다친 부위의 머리카락을 자르십시오.
3단계: 상처에 유리나 기타 이물질이 있는지 검사하십시오. 보이면 손가락이나 핀셋으로 물체를 제거하십시오. 피부를 움직일 때 상처 아래 조직이 지나가는 것처럼 보이면 상처를 꿰매야 할 것입니다.
4단계: 깨끗한 물로 상처를 철저히 씻으십시오. 적용할 때 통증을 유발할 수 있는 가정용 방부제를 피하십시오.
5단계: 깨끗한 천, 멸균 드레싱 또는 생리대를 사용하여 상처를 덮습니다.
6단계: 드레싱 위에 손을 대고 세게 누릅니다.
7단계: 출혈을 멈추기 위해 드레싱에 압력을 가하십시오. 드레싱에 혈액이 스며든 경우 제거하지 마십시오. 더 많은 드레싱을 바르고 출혈이 멈출 때까지 계속 압박하십시오. 5분 이내에 출혈이 멈추지 않으면 개를 수의사에게 이송하는 동안 상처에 계속 압력을 가하십시오.
8단계: 찢어진 헝겊이나 기타 부드러운 물질을 드레싱 주위에 감싸고 붕대가 계속 붙을 수 있을 만큼만 단단히 묶거나 테이프로 묶습니다. 상처 아래에서 시작하여 위로 감습니다.
9단계: 상처가 꿰매어야 할 정도로 깊다면 강아지가 다친 다리에 닿지 않도록 하고 즉시 애완동물을 수의사에게 옮깁니다.
1단계: 필요한 경우 개를 제지하십시오.
1a단계: 차분한 어조로 개에게 천천히 다가가십시오.
1b단계: 자신을 보호하기 위해 개에 입마개를 씌워주세요.
2단계: 상처가 가슴에 있고 "빠는" 소리가 들리면 공기가 들어가지 않도록 상처를 단단히 붕대하고 개를 즉시 수의사에게 옮깁니다. 그렇지 않은 경우 3단계로 진행합니다.
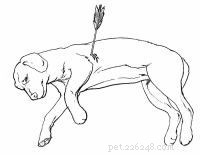
3단계: 화살표와 같이 튀어나온 물체가 있는 경우 제거하려고 하지 마십시오. 그렇지 않은 경우 4단계로 진행합니다.
3a단계: 입구 주변에 깨끗한 천, 멸균 드레싱 또는 생리대를 두십시오.
3b단계: 입구 주위에 단단히 붕대를 감습니다.
3c단계: 개를 즉시 수의사에게 옮깁니다.
4단계: 다친 부위의 머리카락을 자르십시오.
5단계: 상처에 유리나 기타 이물질이 있는지 검사하십시오. 보이면 손가락이나 핀셋으로 물체를 제거하십시오. 피부를 움직일 때 상처 아래 조직이 지나가는 것처럼 보이면 상처를 꿰매야 할 것입니다.
6단계: 깨끗한 물로 상처를 완전히 씻어내십시오.
7단계: 깨끗한 천, 멸균 드레싱 또는 생리대를 사용하여 상처를 덮습니다.
8단계: 드레싱 위에 손을 대고 세게 누릅니다.
9단계: 출혈을 멈추기 위해 드레싱에 압력을 가하십시오. 드레싱에 혈액이 스며든 경우 제거하지 마십시오. 더 많은 드레싱을 바르고 출혈이 멈출 때까지 계속 압박하십시오.
10단계: 찢어진 시트나 기타 부드러운 재료를 드레싱 주위에 감싸고 붕대가 계속 붙을 수 있을 만큼만 단단히 묶거나 테이프로 묶습니다.
11단계: 상처가 꿰매어야 할 정도로 깊으면 즉시 수의사에게 데려가십시오.
1단계: 필요한 경우 개를 제지하십시오.
1a단계: 차분한 어조로 개에게 천천히 다가가십시오.
1b단계: 자신을 보호하기 위해 개에 입마개를 씌워주세요.
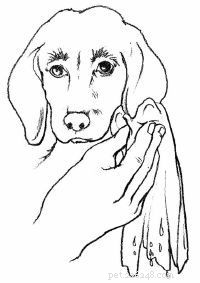
2단계: 깨끗한 천, 멸균 드레싱 또는 생리대를 사용하여 상처를 덮습니다. 귀 덮개의 양쪽에 드레싱 재료를 놓고 개의 머리 위로 접고 단단히 잡고 출혈을 조절합니다.
3단계: 찢어진 시트나 헝겊을 드레싱, 귀, 머리 주위에 감싸서 귀 전체를 덮도록 합니다. 붕대를 테이프로 고정하거나 묶습니다.
4단계: 개를 즉시 수의사에게 옮깁니다.
부러진 손톱이나 너무 짧게 자른 손톱은 손톱 출혈의 가장 흔한 원인입니다. 발톱을 깎는 것이 불편하다면 개를 미용실에 데려가십시오.
못이 부러진 경우:
1단계: 필요한 경우 개를 제지하십시오.
1a단계: 차분한 어조로 개에게 천천히 다가가십시오.
2단계: 개의 입에 재갈을 물리지 않고 부러진 손톱을 자르거나 제거하려고 하지 마십시오.
3단계: 깨끗한 천, 멸균 드레싱 또는 생리대를 손톱에 대십시오. 출혈은 몇 분 안에 멈출 것입니다.
4단계: 가능한 한 빨리 개를 수의사에게 옮깁니다.
손톱이 너무 짧게 잘린 경우:
1단계: 필요한 경우 개를 제지하십시오.
1a단계: 차분한 어조로 개에게 천천히 다가가십시오.
1b단계: 개의 목에 가죽끈을 걸고 고정된 물체 주위에 가죽끈을 두십시오. 개를 이 물체에 대고 당기고 개가 머리를 움직일 수 없도록 목줄을 묶습니다.
1c단계: 자신을 보호하기 위해 개에 입마개를 씌워주세요.
2단계: 깨끗한 천, 멸균 드레싱 또는 생리대를 손톱에 대십시오.
3단계: 최소 5분 동안 해당 부위를 세게 누르십시오. 출혈이 멈출 때까지 붕대를 풀지 마십시오.
4단계: 15~20분 이내에 출혈이 멈추지 않으면 가능한 한 빨리 수의사에게 개를 옮깁니다. 지속적인 출혈은 즉시 치료해야 하는 출혈 장애를 나타냅니다.
내부 출혈은 항상 응급 상황입니다. 내부 출혈의 징후는 창백하거나 흰색 잇몸입니다. 빠른 심장 박동 또는 호흡; 귀, 코, 입 또는 직장에서 출혈. 다음 단계는 잠재적인 쇼크에 대해 개를 치료하고 즉시 전문가의 도움을 받을 수 있도록 개를 이송하는 데 도움이 됩니다.
1단계: 외부 상처로 인해 출혈이 있는 경우 쇼크 치료를 받으십시오.
1a단계: 잇몸이 보이도록 윗입술을 부드럽게 들어 올려 잇몸을 검사합니다. 창백하거나 흰색 잇몸은 개가 쇼크 상태에 있는 것이 거의 확실하며 심각한 내부 부상 및/또는 출혈이 있을 수 있음을 나타냅니다. 잇몸이 분홍색이라면 강아지가 충격을 받은 것은 아닐 것입니다.
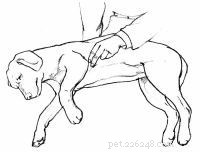
1b단계: 심장 박동을 결정하십시오. 개의 가슴 중앙에 있는 개의 팔꿈치 뒤 약 2인치 뒤에 손가락을 단단히 고정하십시오. 10초 동안의 박동 수를 세고 6을 곱합니다. 개가 쇼크 상태에 있으면 심장 박동은 분당 150회 이상일 수 있습니다.
2단계: 머리를 펴고 개를 옆으로 눕힙니다.
3단계: 강아지의 혀를 부드럽게 당겨 기도를 열어둡니다.
4단계: 개를 베개나 접힌 수건 위에 올려 놓아 강아지의 뒷다리를 약간 들어 올리십시오.
5단계: 체온을 보존하려면 개를 담요나 재킷으로 감싸십시오.
6단계: 개를 즉시 수의사에게 옮깁니다.
bloating은 개에게 돌연사를 일으킬 수있는 심각한 상태입니다. 다음 섹션에서는 팽만감의 징후와 반려동물이 팽만감으로 고통받고 있다고 의심되는 경우 취해야 할 조치에 대해 설명합니다.
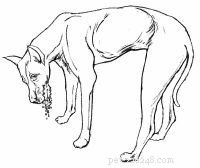
겉보기에 건강해 보이는 개가 한 시간 안에 목숨을 걸고 싸울 수 있다는 사실을 받아들이기 어렵습니다. 고창은 매우 심각하고 잠재적으로 치명적인 상태입니다. 전문적인 치료가 시급하며 지연되어서는 안 됩니다.
팽창은 다른 품종보다 크고 가슴이 깊은 개에게 더 많은 영향을 미치는 것으로 보입니다. 증상은 극적이고 틀림이 없으며 과도한 침을 흘리고 서두르며 동요를 포함합니다. 확대 된 복부; 그리고 잦은 구토 시도로 인해 다량의 하얀 거품이 생성되거나 전혀 생성되지 않습니다.
팽만감이 발생하는 이유에 대한 만족스러운 과학적 설명은 없습니다. 기본적으로 위는 부풀어 오른 풍선처럼 가스로 가득 차 있습니다. 그러나 풍선에는 확장의 여지가 있습니다. 위장에는 위가 없으므로 가스가 비장, 간 및 기타 내장에 압력을 가합니다.
애완 동물이 팽만감을 앓고 있다고 의심되면 즉시 수의사에게 개를 옮깁니다. 복부팽만 후에는 종종 위 비틀림(위가 뒤집힘)이 일어나며, 이는 몇 시간 만에 쇼크와 사망으로 이어집니다.
팽만감과 뒤따르는 비틀림을 방지하려면 개에게 한 번의 큰 식사보다 작은 식사를 하루에 여러 번 먹이고 식사 후에 무거운 운동을 피하도록 하십시오.
부목을 부착하는 방법을 포함하여 애완 동물의 다리가 부러진 경우 취해야 할 조치에 대한 조언은 다음 섹션을 확인하십시오.
사람과 마찬가지로 개도 모든 뼈가 부러지기 쉽지만 다리 골절이 가장 흔합니다. 개는 높은 통증 내성을 가지고 있으며 종종 매달린 다리가 통증을 유발하지 않는 것처럼 보인다는 것을 기억하는 것이 중요합니다. 그러므로 골절된 사지를 다루는 것을 두려워하지 마십시오(그러나 부드럽게!). 개가 아프면 알려줄 것입니다.
찾아봐야 할 징후로는 다리가 기형으로 보이고, 축 늘어지고, 체중을 지탱할 수 없고, 부어오릅니다. 또한 창백하거나 하얀 잇몸, 빠른 심장 박동 또는 빠른 호흡을 포함한 쇼크 징후에 주의하십시오.
개의 부러진 뼈를 적절하게 관리하려면 다음 팁을 사용하세요.
1단계: 필요한 경우 개를 제지하십시오.
1a단계: 차분한 어조로 개에게 천천히 다가가십시오.
1b단계: 개의 목에 가죽끈을 걸고 고정된 물체 주위에 가죽끈을 두십시오. 개를 이 물체에 대고 당기고 개가 머리를 움직일 수 없도록 목줄을 묶습니다.
1c단계: 자신을 보호하기 위해 개에 입마개를 씌워주세요.
2단계: 다리를 검사하고 골절이 열려 있는지(절단 부근의 상처 또는 뼈가 피부에서 튀어나옴) 폐쇄되었는지(피부에 골절이 없는지) 확인합니다.

3단계: 골절이 닫힌 경우 4단계로 진행합니다. 골절이 열린 경우:
3a단계: 깨끗한 물로 상처를 완전히 씻어내십시오.
3b단계: 멸균 붕대, 깨끗한 천, 생리대 등으로 상처를 덮습니다.
3c단계: 골절을 부목으로 만들려고 하지 마십시오. 부목이 없는 팔다리 아래에 접힌 큰 수건을 잡고 개를 즉시 수의사에게 옮깁니다.
4단계: 부러진 팔다리가 심하게 기형이거나 부목을 시도할 때 개가 매우 고통스러워하는 것처럼 보이면 중지하고 5단계로 진행합니다. 그렇지 않으면 뼈 부목을 진행합니다.
4a단계: 막대기, 신문지, 잡지 또는 딱딱한 판지 등 가능한 모든 부목 재료를 사용하십시오. 목적은 사지를 재설정하는 것이 아니라 고정시키는 것입니다.
4b단계: 찢어진 천이나 거즈로 부목을 골절된 다리에 부착합니다.
4c단계: 스트립을 테이프로 단단히 묶거나 묶으십시오. 그러나 혈액 순환이 손상될 수 있으므로 너무 세게 조이지 마십시오.
4d단계: 개를 즉시 수의사에게 옮깁니다.
5단계: 부러진 팔다리가 심하게 기형이거나 부목을 시도할 때 개가 심한 통증을 느끼는 것처럼 보이면 부목이 없는 팔다리 아래에 큰 수건을 잡고 지지를 위해 개를 즉시 수의사에게 옮깁니다.
다음 섹션의 팁을 확인하여 애완동물의 화상에 대비하십시오.
개는 주인이 요리하는 동안 발 밑에 있는 것을 좋아합니다. 이것은 인간의 가장 친한 친구의 훌륭한 특성일 수 있지만 부엌에서 끓는 물이나 뜨거운 식용유를 사용할 때도 위험할 수 있습니다.
개는 화재, 열, 끓는 액체, 화학 물질 및 전기로 인해 1도, 2도 또는 3도 화상을 입을 수 있습니다. 모두 고통스럽고 손상을 입힐 수 있으며 심지어 사망까지 이를 수 있습니다. 통증과 피부 붉어짐으로 나타나는 표재성 화상은 일반적으로 심각하지 않습니다. 그러나 통증을 완화하려면 가능한 빨리 응급처치를 해야 합니다.
다음 팁은 치료 중인 화상 유형을 식별하는 데 도움이 될 뿐만 아니라 부상을 가장 잘 치료하는 방법에 대한 제안도 제공합니다.
1도 화상의 징후에는 온전하거나 그을린 털, 통증이 있는 병변 또는 수포가 있을 수 있는 붉은 피부가 있습니다. 2도 화상의 징후는 그을린 털이나 통증이 있는 병변으로, 부기와 물집과 함께 황갈색으로 변합니다. 이러한 경고 신호를 발견하면 다음과 같이 하십시오.
1단계: 필요한 경우 개를 제지하십시오.
2단계: 화상 부위에 찬물이나 얼음찜질을 하고 15분 동안 피부에 닿은 상태를 그대로 둡니다. 연고나 버터를 바르지 마십시오.
3단계: 화상이 개의 몸의 많은 부분을 덮거나 개가 핥을 수 있는 위치에 있는 경우 멸균 드레싱으로 해당 부위를 덮으십시오. 면을 사용하지 마십시오.
4단계: 찢어진 헝겊이나 기타 부드러운 재료로 드레싱을 감싸고 제자리에 고정될 수 있을 만큼만 단단히 묶거나 테이프로 묶습니다.
5단계: 가능한 한 빨리 개를 수의사에게 옮깁니다.
3도 화상의 징후에는 피부 전체의 파괴, 검은색 또는 새하얀 병변, 쉽게 빠지는 털 등이 있습니다. 또한 창백하거나 하얀 잇몸, 빠른 심장 박동 또는 빠른 호흡을 포함한 쇼크 징후가 있는지 살펴보십시오. 이러한 징후를 발견한 경우 대처 방법은 다음과 같습니다.
1단계: 필요한 경우 개를 제지하십시오.
1a단계: 차분한 어조로 개에게 천천히 다가가십시오.
2단계: 개에게 쇼크가 있는지 검사하십시오. 충격을 받지 않은 경우 3단계로 진행합니다.
2a단계: 잇몸이 보이도록 윗입술을 부드럽게 들어 올려 잇몸을 검사합니다. 창백하거나 흰색 잇몸은 개가 거의 확실히 쇼크 상태임을 나타냅니다. 잇몸이 분홍색이라면 강아지가 충격을 받은 것은 아닐 것입니다.
2b단계: 심장 박동을 결정하십시오. 개의 가슴 중앙에 있는 개의 팔꿈치 뒤 약 2인치 뒤에 손가락을 단단히 고정하십시오. 10초 동안의 박동 수를 세고 6을 곱합니다. 개가 쇼크 상태에 있으면 심장 박동은 분당 150회 이상일 수 있습니다.
2c단계: 머리를 펴고 개를 옆으로 눕힙니다. 강아지의 혀를 부드럽게 당겨 기도를 열어둡니다.
2d단계: 개를 베개나 접힌 수건 위에 올려 둠으로써 개의 뒷부분을 약간 들어 올리십시오. 체온을 보존하려면 개를 담요나 재킷으로 감싸십시오.
3단계: 연고나 버터를 바르지 마십시오. 화상 부위에 건조하고 깨끗한 드레싱을 바르십시오. 면을 사용하지 마십시오.
4단계: 찢어진 헝겊이나 기타 부드러운 재료로 드레싱을 감싸고 제자리에 고정될 수 있을 만큼만 단단히 묶거나 테이프로 묶습니다.
5단계: 가능한 한 빨리 개를 수의사에게 옮깁니다.
화학적 화상의 징후에는 테레빈유, 가솔린 또는 살충제와 같은 화학적 냄새; 붉어진 피부; 또는 고통. 이러한 징후가 보이면 다음을 수행하십시오.
1단계: 필요한 경우 개를 제지하십시오.
1a단계: 차분한 어조로 개에게 천천히 다가가십시오.
2단계: 비누와 물로 해당 부위를 철저히 씻으십시오. 화학 물질을 제거하는 데 필요한만큼 반복합니다. 순한 비누를 사용하고 거품을 잘 내십시오. 어떤 종류의 용매도 사용하지 마십시오.
3단계: 자세한 지침은 수의사에게 문의하십시오.
당신의 개가 모든 것에 빠져들나요? 기도를 깨끗하게 하고 CPR을 시행하는 방법을 포함하여 질식견 치료에 대한 응급 처치 요령은 다음 섹션을 확인하십시오.
개가 이물질에 질식하면 즉시 도움이 필요합니다. 숨을 쉬려고 하면 할수록 더 패닉 상태가 됩니다. 이 비상 상황에서 당신의 목표는 물지 않고 개의 기도를 여는 것입니다.
개가 질식하고 있다는 징후에는 입을 벌리고 있는 것, 창백하거나 푸른 혀, 명백한 고통 또는 의식 불명 등이 있습니다. 강아지가 의식이 없고 이물질이 있다고 생각되면 강아지에게 심폐소생술(CPR)을 하기 전에 기도를 열어야 합니다. 개가 숨을 쉴 수 없으면 소생시키려는 노력이 소용이 없습니다.
이 모든 것이 상당히 압도적으로 들리지만 아래에 요약된 기본 팁을 따르면 질식하거나 의식이 없는 개를 도울 수 있습니다. 당신의 노력이 개의 생명을 구할 수 있습니다!
1단계: 필요한 경우 개를 제지하십시오.
1a단계: 차분한 어조로 개에게 천천히 다가가십시오.
2단계: 기도를 깨끗이 하십시오.
2a단계: 한 손으로 주둥이 위로 윗턱을 잡아 조심스럽게 개의 입을 벌립니다.
2b단계: 입술이 개의 치아와 손가락 사이에 오도록 한 쪽은 엄지손가락으로 다른 쪽은 손가락으로 눌러 윗니 위로 개의 입술을 누릅니다. 입을 벌리도록 강한 압력을 가하십시오.
2c단계: 물체가 보이면 손가락으로 제거해 보십시오.
2d단계: 물건을 제거할 수 없고 개가 충분히 작은 경우 뒷다리를 잡고 물건을 집습니다. 뒤집어서 세게 흔든다. 흔들면서 등을 두드리면 물체를 빼내는 데 도움이 될 수 있습니다.
2e단계: 물건을 제거할 수 없고 개가 집기에는 너무 큰 경우 바닥에서 개를 옆으로 눕힙니다. 흉곽 바로 뒤에 손을 놓고 아래로 살짝 앞으로 빠르고 강하게 누릅니다. 풀어 주다. 물체가 나올 때까지 빠르게 여러 번 반복합니다.
3단계: 물체를 제거할 수 없으면 즉시 수의사에게 개를 이송하십시오.
4단계: 물건을 빼냈는데 개가 숨을 쉬지 않으면 가슴 중앙에 있는 개의 팔꿈치 뒤에 약 2인치 손가락을 놓아 심장 박동을 느껴보십시오.
5단계: 개의 심장이 뛰지 않으면 6단계로 진행하고, 심장이 뛰면 인공호흡을 한다.

5a단계: 개를 옆으로 돌립니다.
5b단계: 개의 머리와 목을 확장하십시오. 개의 입과 입술을 닫고 콧구멍에 세게 바람을 불어 넣습니다. 3~5초마다 1회의 호흡을 시행합니다. 심호흡을 하고 저항을 느끼거나 가슴이 올라갈 때까지 반복합니다.
5c단계: 10초 후 정지합니다. 개가 스스로 호흡하고 있음을 나타내기 위해 가슴의 움직임을 관찰하십시오.
5d단계: If the dog is not breathing, continue artificial respiration.
Step 6: If the heart is not beating, perform CPR.
Step 6a: Turn the dog on its back.
Step 6b: Kneel down at the head of the dog.
Step 6c: Clasp your hands over the dog's chest with your palms resting on either side of its chest.
Step 6d: Compress your palms on the chest firmly for a count of "2," and release for a count of "1." Moderate pressure is required. Repeat about 60 to 90 times per minute.
Step 6e: Alternately (after 30 seconds), hold the dog's mouth and lips closed and blow firmly into its nostrils. Blow for 3 seconds, take a deep breath, and repeat until you feel resistance or see the dog's chest rise. Try to repeat this 10 to 20 times per minute. As a general rule, use a CPR ratio of about 5 heart compressions to 1 breath of air.
Step 6f: After 1 minute, stop. Look at the chest for breathing movement, and feel for a heartbeat by placing fingers about 2 inches behind the dog's elbow in the center of its chest.
Step 6g: If the dog's heart is not beating, continue CPR. If the heart starts beating, but the dog is still not breathing, return to Step 5.
Step 6a: Turn the dog on its side.
Step 6b: Place the palm of your hand in the middle of the dog's chest.
Step 6c: Press for a count of "2," and release for a count of "1." Firm pressure is required. Repeat about 60 to 90 times per minute.
Step 6d: Alternately (after 30 seconds), hold the dog's mouth and lips closed and blow firmly into its nostrils. Blow for 3 seconds, take a deep breath, and repeat until you feel resistance or see the chest rise. Try to repeat this 10 to 20 times per minute.
Step 6e: After 1 minute, stop. Look at the chest for breathing movement, and feel for a heartbeat by placing your fingers about 2 inches behind the dog's elbow in the center of its chest.
Step 6f: If the dog's heart is not beating, continue CPR. If the heart starts beating but the dog is still not breathing, return to Step 5.
Step 7: Transport the dog immediately to the veterinarian. CPR or artificial respiration should be continued on the way to the veterinarian or until dog is breathing and its heart is beating without assistance.
Witnessing a seizure can be a scary thing, but don't panic. Use the tips on the next page to help you if your pet experiences convulsions or seizures.
A convulsion or seizure is the result of constant electrical firing of the muscles of the body from the brain. Convulsions are rarely fatal, and most last only a few minutes. A typical seizure is then followed by 15 minutes to a half hour of recovery time, during which period the dog may be dazed and confused.
Not all seizures are due to epilepsy. Some are caused by lead or other poisons, liver diseases, and even brain tumors. Seizures or convulsions should never be taken lightly. The problem should be discussed with your veterinarian as soon as possible.
The most important thing to do if your dog is experiencing a seizure is to protect it from self-injury. Be patient, don't panic, and use the following tips to provide proper care.
Step 1: DO NOT place your fingers or any object in the dog's mouth.
Step 2: Pull the dog away from walls and furniture to prevent self-injury.
Step 3: Seizures can raise your dog's body temperature fast, so don't wrap the dog in a blanket or towel for comfort until the seizure is over. Instead, place cool washcloths on his feet to help keep his temperature from rising.
Step 4: After the seizure has stopped, contact your veterinarian for further instructions. You can now wrap your dog in a towel or blanket to comfort him after the seizure he's alert.
Step 5: If you're able to, time your dog's seizure. If it lasts less than 2 minutes, he should be OK but you should still consult with your veterinarian. If it lasts between 2 and 5 minutes, this is starting to hit the warning zone and you dog should take your dog to the vet as soon as possible. If the seizure lasts longer than 5 minutes, he needs to be treated by your veterinarian immediately.
A common ailment among most pets, diarrhea can become a serious problem if not treated properly. Turn to the next section for helpful tips.
Diarrhea is a commonly encountered problem that occurs when food is passed through a dog's intestine too rapidly. It can be caused by allergies, milk, parasites, spoiled food, or bacterial infection. There are also more serious causes such as tumors; viral infections; and diseases of the liver, pancreas, and kidney.
Be sure to seek professional help if blood, severe depression, or abdominal pain are present in your pet. Otherwise, use the following suggestions to help ease a dog's discomfort.
Step 1: Remove all food for 12 to 24 hours. Water is important to prevent dehydration in severe diarrhea. It should not be removed.
Step 2: If blood appears or if diarrhea continues for more than 24 hours, contact the veterinarian. He or she will probably want to see a stool sample.
Step 3: After at least 12 hours, treat the dog by feeding it a bland diet such as boiled skinless chicken and rice (50:50 mixture). When stools begin to form, slowly phase back to regular diet. Kaopectate or Pepto-Bismol can be safely used in dogs. Call your veterinarian for the correct dosage for your pet.
When people think of animal bites, they usually think of a human being bit by a dog. But dogs can also be the victims of bites from dogs or other animals lurking in the backyard. Check the next section for first-aid tips when your dog experiences an animal bite.
When a dog gets into a fight with another dog, a cat, or a wild animal, damage can occur to both the skin and the underlying tissue. Many dogfights can be avoided by not permitting your dog to run loose and by keeping it on a leash when you walk it. The dog should also be trained to obey your commands.
If your dog does get into a fight, do not try to break it up with your bare hands. A fighting dog will bite anything in its way, including you. Pull your leashed dog out of harm's way or use a long stick. After the fight is over, examine your dog carefully for hidden wounds. You'll often find punctures around the neck area and on the legs. Look through the hair carefully to find bloodstains, which would indicate the skin has been punctured.
It is important to determine if the biting animal has been inoculated against rabies. If the biter is a wild animal such as a skunk or raccoon, efforts should be made to destroy it so the brain can be examined for rabies. Never touch the wild animal with your bare hands, even after it has been killed. Wear gloves or wrap the body in a blanket. Your veterinarian will take care of the rabies examination.
To provide proper care to a dog suffering from an animal bite, use the following tips.
Step 1: Restrain the dog if necessary.
Step 1a: Approach the dog slowly, speaking in a reassuring tone of voice.
Step 1b: Slip a leash around the dog's neck, then place the leash around a fixed object. Pull the dog against this object and tie the leash so the dog cannot move its head.
Step 1c: Muzzle the dog to protect yourself.
Step 2: Clip the hair around the wound.
Step 3: Flush the wound thoroughly with clean water. Avoid home antiseptics, which may cause pain when applied.
Step 4: Examine the wound. If the tissue under the wound appears to pass by when you move the skin, the wound will probably require stitches.
Step 5: DO NOT bandage. Allow the wound to drain unless there is excessive bleeding. If the wound does bleed excessively, follow these steps:
Step 5a: Cover wound with clean cloth, sterile dressing, or sanitary napkin.
Step 5b: Place your hand over the dressing and press firmly.
Step 5c: Keep pressure on the dressing to stop the bleeding.
Step 5d: If blood soaks through the dressing, DO NOT remove it. Apply more dressing and continue to apply pressure until the bleeding stops.
Step 6: If the wound is deep enough to require stitches, transport the dog immediately to the veterinarian.
Step 7: Be sure to contact your veterinarian if your dog is not current on its rabies vaccination.
Dogs are natural swimmers, but situations can occur where a dog swims too far and starts drowning. Turn to the next section to find out how to best handle this type of emergency.
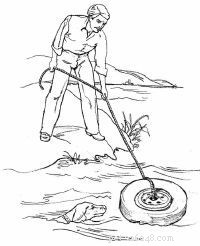
Dogs are naturally good swimmers for short distances, but they can get into trouble. Sometimes they get too far from the shore and tire trying to swim back, or they fall into a swimming pool and cannot get up the steep sides.
Always protect yourself when trying to rescue a drowning dog. An extra few moments of preparation can save two lives -- yours and the dog's. Also be sure to watch for signs of shock, which include pale or white gums, a rapid heartbeat, or rapid breathing. Use the following tips when rescuing a drowning dog.
Step 1: Rescue the dog.
Step 1a: Holding the attached rope, throw a life preserver toward the dog. OR
Step 1b: Try to hook the dog's collar with a pole. OR
Step 1c: Row out to the dog in a boat. OR
Step 1d: As a last resort, swim to the dog. Protect yourself. Bring something for the dog to cling to or climb on and be pulled to shore.
Step 2: Drain the dog's lungs.
Step 2a: If you can lift the dog, grasp the rear legs and hold the animal upside down for 15 to 20 seconds. Give 3 or 4 downward shakes to help drain fluid from its lungs.
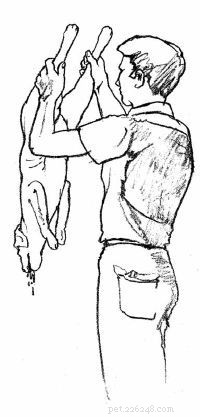
Step 2b: If you cannot lift the dog, place it on a sloping surface with its head low to facilitate drainage.
Step 3: If the dog is not breathing, feel for a heartbeat by placing your fingers about 2 inches behind the dog's elbow in the middle of its chest.
Step 4: If the heart is not beating, proceed to Step 5. If it is, perform artificial respiration.
Step 4a: Turn the dog on its side.
Step 4b: Extend the dog's head and neck. Hold the dog's mouth and lips closed and blow firmly into its nostrils. Administer 1 breath every 3 to 5 seconds. Take a deep breath, and repeat until you feel resistance or see the chest rise.
Step 4c: After 10 seconds, stop. Watch the dog's chest for movement to indicate it is breathing on its own.
Step 4d: If the dog is not breathing, continue artificial respiration.
Step 5: If the heart is not beating, perform cardiopulmonary resuscitation (CPR).
Step 5a: Turn the dog on its back.
Step 5b: Kneel down at the head of the dog.
Step 5c: Clasp your hands over the dog's chest with your palms resting on either side of its chest.
Step 5d: Compress your palms on the chest firmly for a count of "2," and release for a count of "1." Moderate pressure is required. Repeat about 60 to 90 times per minute.
Step 5e: Alternately (after 30 seconds), hold the dog's mouth and lips closed and blow firmly into its nostrils. Blow for 3 seconds, take a deep breath, and repeat until you feel resistance or see the dog's chest rise. Try to repeat this 10 to 20 times per minute. As a general rule, use a CPR ratio of about 5 heart compressions to 1 breath of air.
Step 5f: After 1 minute, stop. Look at the chest for breathing movement, and feel for a heartbeat by placing fingers about 2 inches behind the dog's elbow in the center of its chest.
Step 5g: If the dog's heart is not beating, continue CPR. If the heart starts beating, but the dog is still not breathing, return to Step 4.
Step 5a: Turn the dog on its side.
Step 5b: Place the palm of your hand in the middle of the dog's chest.
Step 5c: Press for a count of "2," and release for a count of "1." Firm pressure is required. Repeat about 60 to 90 times per minute.
Step 5d: Alternately (after 30 seconds), hold the dog's mouth and lips closed and blow firmly into its nostrils. Blow for 3 seconds, take a deep breath, and repeat until you feel resistance or see the chest rise. Try to repeat this 10 to 20 times per minute.
Step 5e: After 1 minute, stop. Look at the chest for breathing movement, and feel for a heartbeat by placing your fingers about 2 inches behind the dog's elbow in the center of its chest.
Step 5f: If the dog's heart is not beating, continue CPR. If the heart starts beating but the dog is still not breathing, return to Step 4.
Step 6: Transport the dog immediately to the veterinarian. CPR or artificial respiration should be continued until the dog is breathing and its heart is beating without assistance.
Puppies love to chew -- and they rarely discriminate between what they chew and what they avoid. If your puppy gets a hold of an electrical cord, you may be faced with treating electrical shock. Check the next section for tips on dealing with this type of pet emergency.
Grown dogs are seldom victims of electrical shock. But puppies are naturally curious and will chew almost anything, including electrical cords. If the insulation is punctured and the mouth comes in contact with both wires, the dog will receive a shock and may be unable to release the cord.
Electrocution can cause severe heart damage and fluid accumulation in the lungs. Strong shock can stop the heart, and CPR will need to be performed immediately to start the heart beating again. In addition, the dog's mouth will likely be burned from contact with the bare wires. Be sure to watch for signs of shock, which include pale or white gums, a rapid heartbeat, or rapid breathing.
To provide the proper care for your pet who is suffering from electrical shock, use the following tips.
Step 1: If the dog still has the electrical cord in its mouth, DO NOT touch the dog. First remove the plug from its outlet.
Step 2: If the dog is unconscious, check for breathing. If the dog is conscious and breathing, proceed to Step 6. If the dog is not breathing, feel for a heartbeat by placing your fingers about 2 inches behind the elbow in the middle of its chest.
Step 3: If the heart is not beating, proceed to Step 4. If it is, perform artificial respiration.
Step 3a: Turn the dog on its side, and extend its head and neck.

Step 3b: Hold the dog's mouth and lips closed and blow firmly into its nostrils. Administer 1 breath every 3 to 5 seconds. Take a deep breath, and repeat until you feel resistance or see the chest rise.
Step 3c: After 10 seconds, stop. Watch the dog's chest for movement to indicate the dog is breathing on its own.
Step 3d: If the dog is not breathing, continue artificial respiration.
Step 4: If the heart is not beating, perform CPR.
Step 4a: Turn the dog on its back.
Step 4b: Kneel down at the head of the dog.
Step 4c: Clasp your hands over the dog's chest with your palms resting on either side of its chest.
Step 4d: Compress your palms on the chest firmly for a count of "2," and release for a count of "1." Moderate pressure is required. Repeat about 60 to 90 times per minute.
Step 4e: Alternately (after 30 seconds), hold the dog's mouth and lips closed and blow firmly into its nostrils. Blow for 3 seconds, take a deep breath, and repeat until you feel resistance or see the dog's chest rise. Try to repeat this 10 to 20 times per minute. As a general rule, use a CPR ratio of about 5 heart compressions to 1 breath of air.
Step 4f: After 1 minute, stop. Look at the chest for breathing movement, and feel for a heartbeat by placing fingers about 2 inches behind the dog's elbow in the center of its chest.
Step 4g: If the dog's heart is not beating, continue CPR. If the heart starts beating, but the dog is still not breathing, return to Step 3.
Step 4a: Turn the dog on its side.
Step 4b: Place the palm of your hand in the middle of the dog's chest.
Step 4c: Press for a count of "2," and release for a count of "1." Firm pressure is required. Repeat about 60 to 90 times per minute.
Step 4d: Alternately (after 30 seconds), hold the dog's mouth and lips closed and blow firmly into its nostrils. Blow for 3 seconds, take a deep breath, and repeat until you feel resistance or see the chest rise. Try to repeat this 10 to 20 times per minute.
Step 4e: After 1 minute, stop. Look at the chest for breathing movement, and feel for a heartbeat by placing your fingers about 2 inches behind the dog's elbow in the center of its chest.
Step 4f: If the dog's heart is not beating, continue CPR. If the heart starts beating but the dog is still not breathing, return to Step 3.
Step 5: Transport the dog immediately to the veterinarian. CPR or artificial respiration should be continued until the dog is breathing and its heart is beating without assistance.
Step 6: If the dog's mouth or lips are burned (bright red), swab them gently with 3% hydrogen peroxide.
Step 7: To conserve body heat, wrap the dog in a blanket or jacket.
Just like humans, dogs often have problems with their eyes due to dust, allergies, and other culprits. See the next page for tips on dealing with eye injuries.
Irritation of the eye in a dog can be caused by allergies, dust and dirt, lashes growing inward, fights, and more. It can result in a mild inflammation of the tissue around the eye (conjunctivitis) or severe damage to the cornea.
When examining a dog's eye, it is important to know that dogs have a third eyelid located in the corner of the eye nearest the nose. This third eyelid can completely cover the eyeball and sometimes gives the appearance that part of the eye is gone.
In addition to being a protective mechanism, the third eyelid can indicate that something is wrong with the eye. If it is raised and looks red, the eye is inflamed. Do not try to touch or manipulate this eyelid.
Other indications that a dog's eye is irritated are squinting and rubbing and pawing at the eye. Your first priority is to prevent your pet from further injuring itself since this often causes more severe damage than the original irritation. Use the following tips to treat your dog's eye injuries.
Step 1: DO NOT try to remove the object.
Step 2: Restrain the dog if necessary.
Step 2a: Approach the dog slowly, speaking in a reassuring tone of voice.
Step 3: Prevent self-injury to the eye.
Step 3a: Dewclaws (if present) should be bandaged on the front paw on the same side as the affected eye.
Step 3b: For small dogs, cut a large piece of cardboard into an Elizabethan-type collar.

Step 3c: For larger dogs, cut the bottom from a plastic bucket, fit the bucket over the dog's head, and hold it in place by tying it to the dog's collar.
Step 4: Transport the dog immediately to the veterinarian.
The typical signs of a scratched or irritated eye include squinting; rubbing or pawing at the eyes; or thick discharge or redness in the eye.
Step 1: Restrain the dog if necessary.
Step 1a: Approach the dog slowly, speaking in a reassuring tone of voice.
Step 2: Flush the dog's eye thoroughly with saline solution or plain water.

Step 3: Prevent self-injury to the eye.
Step 3a: Dewclaws (if present) should be bandaged on the front paw on the same side as the affected eye.
Step 3b: For small dogs, cut a large piece of cardboard into an Elizabethan-type collar.
Step 3c: For larger dogs, cut the bottom from a plastic bucket, fit the bucket over the dog's head, and hold it in place by tying it to the dog's collar.
Step 4: Transport the dog immediately to the veterinarian.
A dog can be sensitive to extreme cold, especially its ears and the tip of its tail. If you suspect your pet is suffering from frostbite, take note of the first-aid tips on the next page.
When a dog is exposed to freezing temperatures for a long period of time, there is always the possibility of frostbite. The signs of frostbite include pain, pale skin in early stages, and red or black skin in advanced stages.
The areas most likely to be frostbitten are those that have little or no hair and the ears and tail tip, which have a limited blood supply. Occasionally, if damage from frostbite is severe, part of the tail or ear tips may actually fall off. Professional attention should be sought before this happens. To provide proper care to a dog suffering from frostbite, use the following tips.
Step 1: Restrain the dog if necessary.
Step 1a: Approach the dog slowly, speaking in a reassuring tone of voice.
Step 1b: Slip a leash around the dog's neck, then place the leash around a fixed object. Pull the dog against this object and tie the leash so the dog cannot move its head.
Step 1c: Muzzle the dog to protect yourself, if necessary.
Step 2: Warm the area with moist towels. The water temperature should be warm but not hot (75 degrees Fahrenheit/24 degrees Celsius). DO NOT use ointment.
Step 3: If the skin turns dark, transport the dog to the veterinarian as soon as possible.
Just as exposure to extreme cold can be harmful to your pet, so, too, can extreme heat. Check the next section to learn how to treat a dog that has heatstroke.
Heatstroke is caused by the inability of the body to maintain its normal temperature because of the environmental heat. It is often caused by keeping a dog in a locked car parked in the sun or by keeping it in any hot area without adequate ventilation.
The signs of heatstroke are excessive drooling, lack of coordination, rapid breathing, and a top of the head that is hot to the touch. Prompt treatment is urgent. Body temperatures often get as high as 107 degrees Fahrenheit/41.5 degrees Celsius, and without quick cooling, severe brain damage and death will occur.
Heatstroke can be prevented by making sure your dog has plenty of shade and ventilation. If you must take your dog driving with you, park in the shade and leave all the windows partially open.
Should heatstroke occur, use the following suggestions to help you provide your dog with the utmost care.
Step 1: Remove the dog from the hot environment.
Step 2: Immerse the dog in a cold water bath or continuously run a garden hose on its body; continue either treatment for at least 30 minutes.
Step 3: Apply ice packs to the top of the head; keep them there while transporting the dog to the veterinarian.
Step 4: Transport the dog to the veterinarian immediately after the above treatment.
Another pet injury that requires immediate professional treatment is hypothermia. Check the next page for tips on what to do if you suspect your pet is suffering from this condition.
Exposure to either cold water or freezing temperatures can cause hypothermia, or subnormal body temperatures. A dog's survival will depend on how low its body temperature drops.
A dog's normal body temperature is 100 to 101 degrees Fahrenheit/38 degrees Celsius. If it drops below 90 degrees Fahrenheit/32 degrees Celsius for any length of time, normal bodily functions will be severely impaired.
The signs of hypothermia include depression, subnormal body temperature, and coma. This condition always requires veterinary attention as soon as possible. Use the following tips to help you provide proper care to a dog suffering from hypothermia.
Step 1: Warm the dog.
Step 1a: Place a hot water bottle (100 degrees Fahrenheit/37 degrees Celsius) against the dog's abdomen. Wrap the bottle in a cloth to prevent burns. Wrap the dog in a blanket or jacket.
Step 2: Transport the dog immediately to the veterinarian.
Just like humans, dogs can be allergic to insect bites, so it's important to know the warning signs. Learn more about treating insect stings on the next page.
While most insect bites to a dogwill be uneventful, if your pet has been stung by a bee, wasp, yellow jacket, or hornet, the area will quickly become swollen and somewhat painful. A possible allergic reaction to the venom deposited by the insect is the most serious problem.
The signs of an insect bite include swelling, pain in the muscles and affected area, vomiting, weakness, fever, and shock. The signs of shock are pale or white gums, a rapid heartbeat, or rapid breathing. Below are helpful suggestions on what to do if your pet has been stung by a pest.
Step 1: Restrain the dog if necessary.
Step 1a: Approach the dog slowly, speaking in a reassuring tone of voice.
Step 1b: Muzzle the dog to protect yourself, if necessary.
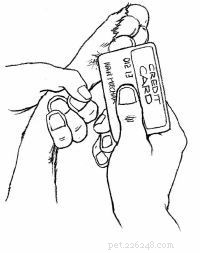
Step 2: DO NOT pinch the area. If the dog has been stung by a bee, scrape the stinger off immediately with a credit card or dull knife. Other insects do not leave the stinger in the skin.
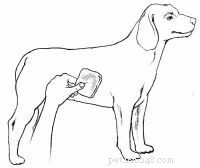
Step 3: If the affected area is swollen and hot, apply cortisone cream and hold ice on the dog's skin for a short time.
Step 4: Administer antihistamine such as diphenhydramine (Benadryl) orally at a dose of 1mg per pound of body weight (e.g., a 25-pound dog would get 25mg pill or capsule).
Step 5: If the dog experiences any difficulty breathing or if its face seems swollen, transport the dog immediately to the veterinarian.
Did you know your house is filled with products that are poisonous to your beloved pet? Check the next page to find out what they are and what to do if your dog gets a hold of one of these harmful substances.
Dogs are curious creatures and like to investigate, which leads to many accidental poisonings each year. Often a dog will find an open can or bottle of some chemical and, accidentally or on purpose, spill it. Naturally the chemical gets on its fur and paws, and while licking the area clean, it swallows the possibly toxic substance. It is your responsibility as a pet owner to keep all potentially toxic products tightly closed and out of your dog's reach.
Some of the signs of a possible poisoning include excessive drooling, vomiting, diarrhea, abdominal pain, twitching, nervousness, convulsions, coma, and a chemical odor on the body. Here's what you can do if your dog is poisoned:
Step 1: If the dog is comatose or convulsing, wrap it in a blanket and transport your pet immediately to the veterinarian with the suspect poison container, plant, or leaf.
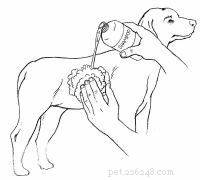
Step 2: If the dog has a chemical odor on its skin, wash the entire dog with mild soap until the odor is gone. If the poison was licked or ingested, flushing the dog's mouth with clean water may also help in decontamination.
Step 3: If the dog has not already vomited and the poison is not a caustic or petroleum product (see lists below), induce vomiting by giving 1 tablespoon of 3% hydrogen peroxide per 20 pounds every 10 minutes until vomiting starts. If no vomiting occurs within 30 minutes, transport the dog immediately to the veterinarian with the suspected poison container.
Step 4: Call the Pet Poison Control hotline for further instructions at 888-426-4435. (There is a charge for this service.)
Caustics include battery acid, corn and callous remover, dishwashing detergent, drain cleaner, grease remover, lye, and oven cleaner. Petroleum products include paint solvent, floor wax, and dry-cleaning solution.
You might be surprised by the number of household items that are poisonous to your dog. Some of the most common are alcoholic beverages, ammonia, antifreeze, bleach, chocolate (baking chocolate is the worst), detergents, disinfectants, dry-cleaning solution, fertilizer, furniture polish, gasoline, glue, grapes and raisins, human medications, mothballs, mouse and rat poison, onions, oven cleaners, paint thinner and remover, shoe polish, silver polish, and toilet bowl cleaner.
In addition, some household plants are toxic to your pet, including aloe vera, amaryllis, avocado, azalea, bird of paradise, calla lily, castor bean, corn plant, cyclamen, daffodil, day lily, dieffenbachia, Easter lily, elephant ears, English ivy, gladiolus, holly, hyacinth, hydrangea, iris, kalanchoe, macadamia nut, mistletoe, narcissus, onion, philodendron, poinsettia, rhododendron, tomato plant, tulip, yew, and yucca.
(This is only a partial list. For a more complete listing, refer to the ASPCA Animal Poison Center at www.aspca.org.)
Dogs can also become poisoned from smoke or carbon monoxide. Check the next section for tips on what to do in this first-aid emergency.

Fires are another possible threat to dogs. Do not risk your own life to save your dog. Leave that task to the firefighters or those trained in rescue.
The signs of smoke or carbon monoxide inhalation include depression, lack of coordination, heavy panting, deep red gums, and possible convulsions. Also watch for signs of shock, which are pale or white gums, a rapid heartbeat, or rapid breathing.
If suspect your pet is suffering from smoke or carbon monoxide inhalation, use the following tips to provide the dog with proper care.
Step 1: Remove the dog from the area and into fresh air immediately.
Step 2: Flush the dog's eyes thoroughly with saline solution or clean water.
Step 3: Transport the dog immediately to the veterinarian.
Step 1: Remove the dog from the area and into fresh air immediately.
Step 2: If the dog is not breathing, feel for a heartbeat by placing your fingers about 2 inches behind the dog's elbow in the middle of its chest.
Step 3: If the heart is not beating, proceed to Step 4. If it is, perform artificial respiration.
Step 3a: Turn the dog on its side.
Step 3b: Hold the dog's mouth and lips closed and blow firmly into its nostrils. Administer 1 breath every 3 to 5 seconds. Take a deep breath, and repeat until you feel resistance or see the dog's chest rise.
Step 3c: After 1 minute, stop. Watch the chest for movement to indicate the dog is breathing on its own.
Step 3d: If the dog is not breathing, continue artificial respiration.
Step 4: If the heart is not beating, perform cardiopulmonary resuscitation (CPR).
Step 4a: Turn the dog on its back.
Step 4b: Kneel down at the head of the dog.
Step 4c: Clasp your hands over the dog's chest with your palms resting on either side of its chest.
Step 4d: Compress your palms on the chest firmly for a count of "2," and release for a count of "1." Moderate pressure is required. Repeat about 60 to 90 times per minute.
Step 4e: Alternately (after 30 seconds), hold the dog's mouth and lips closed and blow firmly into its nostrils. Blow for 3 seconds, take a deep breath, and repeat until you feel resistance or see the dog's chest rise. Try to repeat this 10 to 20 times per minute. As a general rule, use a CPR ratio of about 5 heart compressions to 1 breath of air.
Step 4f: After 1 minute, stop. Look at the chest for breathing movement, and feel for a heartbeat by placing your fingers about 2 inches behind the dog's elbow in the center of its chest.
Step 4g: If the dog's heart is not beating, continue CPR. If the heart starts beating, but the dog is still not breathing, return to Step 3.
Step 4a: Turn the dog on its side.
Step 4b: Place the palm of your hand in the middle of the dog's chest.
Step 4c: Press for a count of "2," and release for a count of "1." Firm pressure is required. Repeat about 60 to 90 times per minute.
Step 4d: Alternately (after 30 seconds), hold the dog's mouth and lips closed and blow firmly into its nostrils. Blow for 3 seconds, take a deep breath, and repeat until you feel resistance or see the chest rise. Try to repeat this 10 to 20 times per minute.
Step 4e: After 1 minute, stop. Look at the chest for breathing movement, and feel for a heartbeat by placing your fingers about 2 inches behind the dog's elbow in the center of its chest.
Step 4f: If the dog's heart is not beating, continue CPR. If the heart starts beating but the dog is still not breathing, return to Step 3.
Step 5: Transport the dog immediately to the veterinarian. CPR or artificial respiration should be continued on the way to the veterinarian or until the dog is breathing and its heart is beating without assistance.
A puncture wound can be quite painful and traumatic for a dog. In the next section, we'll learn how to treat this type of injury.
A puncture wound on a dog may be difficult to see because it is often covered with hair. Since the most common location for a puncture wound is the bottom of the paw, the first sign may be a limp. Slightly blood-tinged fur is a common sign of a puncture wound on other parts of the body.
If you suspect your dog has a puncture wound, be sure to watch for signs of shock, which include pale or white gums, a rapid heartbeat, or rapid breathing. The following tips will help you treat your wounded pet.
Step 1: Restrain the dog if necessary, taking care not to touch the object.
Step 1a: Approach the dog slowly, speaking in a reassuring tone of voice.
Step 1b: Slip a leash around the dog's neck, then place the leash around a fixed object. Pull the dog against this object and tie the leash so the dog cannot move its head.
Step 1c: Muzzle the dog to protect yourself if necessary.
Step 2: DO NOT attempt to remove the object.
Step 3: Place clean cloths, sterile dressings, or sanitary napkins around the point of entry.
Step 4: Bandage tightly around the point of entry.
Step 5: Transport the dog immediately to the veterinarian.

Step 1: Restrain the dog if necessary.
Step 1a: Approach the dog slowly, speaking in a reassuring tone of voice.
Step 2: If the wound is in the chest and a "sucking" noise is heard, bandage tightly enough to seal the wound, and transport the dog immediately to the veterinarian.
Step 3: If the wound is not in the chest, clip the hair around the wound.

Step 4: Examine the wound carefully for foreign objects. If present, remove the object with tweezers or needle-nose pliers.
Step 5: Flush the wound thoroughly with clean water. Avoid home antiseptics, which may cause pain when applied.
Step 6: DO NOT bandage. Allow the wound to drain unless there is excessive bleeding. If the wound does bleed excessively, follow these steps:
Step 6a: Cover wound with clean cloth, sterile dressing, or sanitary napkin.
Step 6b: Place your hand over the dressing and press firmly.
Step 6c: Keep pressure on the dressing to stop the bleeding.
Step 6d: If blood soaks through the dressing, DO NOT remove it. Apply more dressing and continue to apply pressure until the bleeding stops.
Step 7: If the bleeding does not stop within 5 minutes, continue to apply pressure on the wound while transporting the dog to the veterinarian.
Knowing how to identify the signs of shock and how to treat it will help you in many pet first-aid situations. In the next section, learn about proper care for dogs experiencing shock.
Shock is extremely serious; it is the No. 1 killer in accidents. Shock is a reaction to heavy internal or external bleeding or any serious injury that "scares" the body; for example, a large wound or amputation with heavy blood loss. The body tries to compensate for the loss by speeding up the heart rate to keep the blood pressure from falling. At the same time the blood vessels that supply the outside of the body narrow. This is to conserve blood so vital organs of the body can continue to receive their normal blood supply.
However, if there is heavy blood loss or other serious injury, the body overreacts and causes a pooling of blood in the internal organs. This can cause death due to a drop in external blood pressure and possible oxygen starvation of the brain.
The signs of shock include pale or white gums, a rapid faint heartbeat, rapid breathing, or below-normal body temperature (feels cold). If your dog is in shock, use the following tips to provide proper first aid.
Step 1: Examine the dog for shock.
Step 1a: Examine the gums by gently lifting the dog's upper lip so the gum is visible. Pale or white gums indicate the dog is almost certainly in shock and may have serious internal injuries and/or bleeding. If the gums are pink, the dog is probably not in shock.
Step 1b: Determine the dog's heartbeat. Place your fingers firmly on the dog about 2 inches behind the dog's elbow in the center of its chest. Count the number of beats in 10 seconds and multiply by 6. If the dog is in shock its heartbeat may be more than 150 beats per minute.
Step 2: Place the dog on its side with its head extended.
Step 3: Gently pull out the dog's tongue to keep the airway open.
Step 4: Elevate the dog's hindquarters slightly by placing them on a pillow or folded towels.
Step 5: Stop visible bleeding immediately. If blood is spurting and the wound is on the leg or tail, proceed to Step 6.
Step 5a: Cover the wound with a clean cloth, sterile dressing, or sanitary napkin.
Step 5b: Place your hand over the dressing and press firmly.
Step 5c: Keep pressure on the dressing to stop bleeding. If blood soaks through the dressing, DO NOT remove it. Apply more dressing and continue to apply pressure until the bleeding stops. If bleeding does not stop within 5 minutes, continue to apply pressure on the wound while transporting the dog to the veterinarian.
Step 5d: Wrap torn rags or other soft material around the dressing and tie or tape it just tightly enough to keep the bandage on. Start below the wound and wrap upward.
Step 6: If bleeding does not stop within 5 minutes, transport the dog immediately to the veterinarian.
Step 7: To conserve body heat, wrap the dog in a blanket or jacket.
A dog's encounter with a skunk is not only smelly, but it can also be dangerous, since skunks are a major carrier of rabies. Turn to the next page to find out what to do if your pet has been sprayed by a skunk.
Skunks are one of the major carriers of rabies in North America. Therefore, a dog's encounter with a skunk should be treated as more than just a stinky situation. Use the following suggestions to provide proper care for your pet.
Step 1: Restrain the dog if necessary.
Step 1a: Approach the dog slowly, speaking in a reassuring tone of voice.
Step 1b: Slip a leash around the dog's neck, then place the leash around a fixed object. Pull the dog against this object and tie the leash so the dog cannot move its head.
Step 1c: Muzzle the dog to protect yourself.
Step 2: Flush the dog's eyes with fresh water.
Step 3: Remove and destroy leather collars or harnesses.
Step 4: Bathe the dog thoroughly with soap or shampoo and water. Repeat several times.

Step 5: Apply plain tomato juice liberally. After several minutes, bathe the dog again with soap or shampoo and water. Time will eventually remove the odor. Skunk odor neutralizers are available.
Step 6: If the skunk is destroyed, take it to the veterinarian for a rabies examination. DO NOT touch the skunk with your bare hands.
Step 7: If the dog is not currently vaccinated for rabies, contact the veterinarian.
An encounter with a snake can also create a pet emergency situation. See the next section for how to treat snakebites.
Poisonous snakebites are rare in North America. Most snakes are nonpoisonous, and neither poisonous nor nonpoisonous snakes will attack a dog unless provoked. But many pets are curious, and bites will occur.
If you live in or visit a snake-inhabited area, you can expect problems if you let your dog run loose. Be prepared by reading the following tips for treating snakebites.
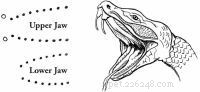
The signs of a poisonous snakebite are two fang marks, pain, swelling, vomiting, difficulty breathing, and possible paralysis and convulsions. Be sure to watch for sings of shock, which include pale or white gums, a rapid heartbeat, or rapid breathing.
Treatment must begin as soon as possible after the bite. If the snake was killed, bring it to the veterinarian for identification. Otherwise, try to remember identifying marks.
Step 1: Restrain the dog if necessary.
Step 1a: Approach the dog slowly, speaking in a reassuring tone of voice.
Step 1b: Slip a leash around the dog's neck, then place the leash around a fixed object. Pull the dog against this object and tie the leash so the dog cannot move its head.
Step 1c: Muzzle the dog to protect yourself if necessary.
Step 2: Clip the hair from the bite area.
Step 3: Flush thoroughly by pouring 3% hydrogen peroxide directly on the bite.
Step 4: Transport the dog immediately to the veterinarian.
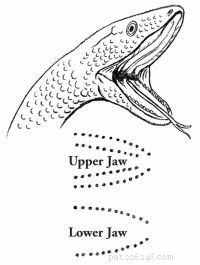
The signs of a nonpoisonous snakebite are a U-shape bite and pain in the bite area. If you are not sure the snake is nonpoisonous, treat as poisonous. See above.
Step 1: Restrain the dog if necessary.
Step 1a: Approach the dog slowly, speaking in a reassuring tone of voice.
Step 1b: Slip a leash around the dog's neck, then place the leash around a fixed object. Pull the dog against this object and tie the leash so the dog cannot move its head.
Step 1c: Muzzle the dog to protect yourself, if necessary.
Step 2: Clip the hair from the bite area.
Step 3: Flush thoroughly by pouring 3% hydrogen peroxide directly on the bite.
Various injuries may cause unconsciousness in a dog. Turn to the next section for tips on what to do in this emergency situation.
Your first priority when dealing with an unconscious dog is to get the heart beating and the dog breathing. Also be sure to watch for signs of shock, which include pale or white gums, a rapid heartbeat, or rapid breathing. Use the following tips to provide proper treatment to a dog that has lost consciousness.
Step 1: If you suspect choking, clear the dog's airway. If the dog is not choking, proceed to
Step 2.
Step 1a: Open the dog's mouth carefully by grasping the upper jaw with one hand over the muzzle.
Step 1b: Press the dog's lips over the upper teeth by pressing your thumb on one side and your fingers on the other so that the lips are between the dog's teeth and your fingers. Apply firm pressure to force the mouth open.
Step 1c: If you can see the object, try to remove it with your fingers.
Step 1d: If you cannot remove the object and the dog is small enough, pick it up by grasping its back legs; turn it upside down and shake vigorously. Slapping its back while shaking may help to dislodge the object.
Step 1e: If you cannot remove the object and the dog is too large to pick up, place the dog on its side on the floor. Place your hand just behind the rib cage and press down and slightly forward quickly and firmly. 풀어 주다. Repeat rapidly several times until the object is expelled.
Step 1f: If you cannot dislodge the object, transport the dog immediately to the veterinarian.
Step 2: If the dog is breathing, check for shock. If the dog is not breathing, proceed to Step 3.
Step 2a: Examine the gums by gently lifting the upper lip so the gum is visible. Pale or white gums indicate the dog is almost certainly in shock and may have serious internal injuries and/or bleeding. If the gums are pink, the dog is probably not in shock.
Step 2b: Determine the heartbeat. Place fingers firmly on the dog about 2 inches behind the dog's elbow in the center of its chest. Count the number of beats in 10 seconds and multiply by 6. If the dog is in shock its heartbeat may be more than 150 beats per minute.
Step 2c: Place the dog on its side with its head extended. Gently pull out the dog's tongue to keep the airway open.
Step 2d: Elevate the dog's hindquarters slightly by placing them on a pillow or folded towels. To conserve body heat, wrap the dog in a blanket or jacket.
Step 2e: Transport the dog immediately to the veterinarian.
Step 3: Feel for a heartbeat by placing your fingers about 2 inches behind the dog's elbow in the middle of its chest.

Step 4: If the dog's heart is not beating, proceed to Step 5. If it is, perform artificial respiration.
Step 4a: Turn the dog on its side.
Step 4b: Hold the dog's mouth and lips closed and blow firmly into its nostrils. Administer 1 breath every 3 to 5 seconds. Take a deep breath, and repeat until you feel resistance or see the dog's chest rise.
Step 4c: After 10 seconds, stop. Watch the chest for movement to indicate the dog is breathing on its own.
Step 4d: If the dog is not breathing, continue artificial respiration.
Step 5: If the heart is not beating, perform CPR.
Step 5a: Turn the dog on its back.
Step 5b: Kneel down at the head of the dog.
Step 5c: Clasp your hands over the dog's chest with your palms resting on either side of its chest.
Step 5d: Compress your palms on the chest firmly for a count of "2," and release for a count of "1." Moderate pressure is required. Repeat about 60 to 90 times per minute.
Step 5e: Alternately (after 30 seconds), hold the dog's mouth and lips closed and blow firmly into its nostrils. Blow for 3 seconds, take a deep breath, and repeat until you feel resistance or see the dog's chest rise. Try to repeat this 10 to 20 times per minute. As a general rule, use a CPR ratio of about 5 heart compressions to 1 breath of air.
Step 5f: After 1 minute, stop. Look at the chest for breathing movement, and feel for a heartbeat by placing your fingers about 2 inches behind the dog's elbow in the center of its chest.
Step 5g: If the dog's heart is not beating, continue CPR. If the heart starts beating, but the dog is still not breathing, return to Step 4.
Step 5a: Turn the dog on its side.
Step 5b: Place the palm of your hand in the middle of the dog's chest.
Step 5c: Press for a count of "2," and release for a count of "1." Firm pressure is required. Repeat about 60 to 90 times per minute.
Step 5d: Alternately (after 30 seconds), hold the dog's mouth and lips closed and blow firmly into its nostrils. Blow for 3 seconds, take a deep breath, and repeat until you feel resistance or see the chest rise. Try to repeat this 10 to 20 times per minute.
Step 5e: After 1 minute, stop. Look at the chest for breathing movement, and feel for a heartbeat by placing your fingers about 2 inches behind the dog's elbow in the center of its chest.
Step 5f: If the dog's heart is not beating, continue CPR. If the heart starts beating but the dog is still not breathing, return to Step 4.
Step 6: Transport the dog immediately to the veterinarian. CPR or artificial respiration should be continued on the way to the veterinarian or until the dog is breathing and its heart is beating without assistance.
Like diarrhea, vomiting is not necessarily a serious problem unless a dog becomes dehydrated. Check the next page for tips on what potential problems to look for.
Vomiting is one of the most commonly encountered problems in veterinary medicine. It is nature's way of permitting the dog to rid its stomach of an irritating substance such as spoiled food.
But not all vomiting is due to simple irritation. More serious causes are viral infections or diseases of the liver, pancreas, or kidney. It is important to seek professional help if there are signs of bleeding or if the dog is depressed and still vomiting after initial efforts at control have failed. Here are some tips for treating a vomiting dog:
Step 1: Remove all food and water for at least 12 to 24 hours.
Step 2: If vomiting contains blood or is frequent, contact the veterinarian immediately. If not, proceed to Step 3.
Step 3: After 12 to 24 hours of no vomiting, introduce water gradually at 1 to 2 ounces at a time. If no vomiting occurs, offer a bland diet of boiled skinless chicken and rice (50:50 mixture). If this is held down, transition to regular diet over the next 2 days by mixing an increasing quantity of regular dog food with bland diet.
Step 4: Pepto-Bismol can be safely used for dogs. Call the veterinarian for recommended dose.
A dog giving birth to puppies can be quite an amazing experience -- for both the dog and its owner. Turn to the next page to learn how to be prepared to help a dog if problems occur during the birth process.
A dog's normal length of pregnancy (gestation period) is 61 to 63 days. However, delivery 1 or 2 days earlier or later is not unusual and presents no cause for alarm as long as the general health of the dog is good.
In preparation for whelping, the dog will make a nest with newspapers and rags if they are available. If they are not, she may dig into the carpeting with her front paws, almost as if she were digging a hole. This is termed "nest building" and is a fairly consistent sign that delivery will follow soon, usually within 2 to 3 days. To make your pet feel comfortable about delivering (and to save your carpet!) provide a whelping box with plenty of newspapers and rags.
At about the same time the nest building occurs, you should also notice an enlargement of the breasts with milk production. Another fairly consistent method of determining when the dog will deliver is to take her temperature each day. Approximately 24 hours before delivery, her temperature will drop about 2 degrees Fahrenheit/1 degree Celsius.
When she is getting close to labor, a mucous discharge appears at the vulva followed by a greenish discharge. At no time should there be a brown or foul-smelling discharge. If this is present, contact your veterinarian immediately.
The onset of labor will make the dog somewhat restless, but it is not until the second stage of labor that she will actually lie down and have abdominal contractions. Once the second stage of labor begins, delivery should begin within 3 hours. If no pups are delivered by that time, professional help should be obtained.
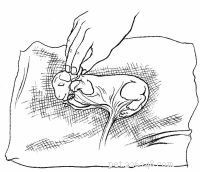
A puppy may be born in one of three ways. The most common presentation is head and feet first. The second most common is rear legs and tail first, not to be confused with a true breech birth. In a true breech only the rump is presented, with the rear legs folded under the body of the puppy. In a small bitch, this type of presentation can cause problems and should be watched for carefully.
Complications may arise during the birthing process that you can handle quite easily by using the tips below.
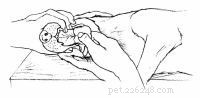
Step 1: Grasp the puppy with a clean towel.
Step 2: Applying steady traction, gently pull the puppy at a slight downward angle. Continue pulling gently and steadily until the pup is delivered.
Step 3: If you are unable to remove the puppy, contact the veterinarian immediately.
Step 1: Put the pup, covered in the fetal membrane, on a clean towel.
Step 2: Peel the membrane off its face immediately.
Step 3: Continue to pull the membrane from its body. The membrane will collect around the umbilical cord. DO NOT pull on the umbilical cord.
Step 4: Wipe any fluid off the nostrils and mouth. Rub the puppy's body vigorously with a towel to stimulate breathing.
Step 5: If there is heavy mucus in the mouth and nose, clean out what you can with your finger.
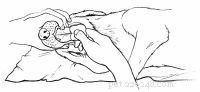
Step 6: If the puppy is still having trouble breathing:
Step 6a: Place the puppy in a towel on the palm of your hand.
Step 6b: Cradle its head by closing your thumb toward your fingers.
Step 6c: Using your other hand to secure the puppy, lift your hands to head level and swing firmly down toward the floor. Repeat several times.
Step 6d: Vigorously rub the puppy again with the towel.
Step 6e: Stop when the puppy is actively moving and crying.
Step 7: Tie a thread around the umbilical cord about 1 inch above the puppy's abdomen. Leaving the tied portion attached to the puppy, cut off the rest of the umbilical cord and fetal membrane.
Step 8: Place the puppy with its mother. She will take care of the rest. If she does not take care of the puppies, or if any other problem develops, contact the veterinarian as soon as possible.
Seeing a dog hurt or in distress can be such a helpless feeling. By learning the tips outlined in this article, you can arm yourself with dozens of first-aid techniques that may end up saving the life of your beloved pet.
Publications International, Ltd.
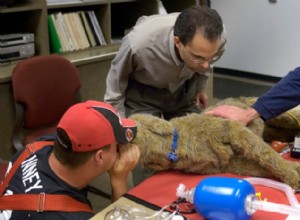
수의사 Mike Estrin 박사(가운데)가 두 명의 미네소타주 뉴브라이튼 소방관에게 개 심폐소생술 시행 방법을 가르치고 있습니다. CPR 연습견을 사용합니다. 하나는 입에서 주둥이 호흡을 시뮬레이션하는 반면 다른 하나는 폐가 공기로 채워지는 느낌입니다. 그것은 내 최악의 악몽이었다. 나의 사랑하는 13세 잉글리시 불독 엘리는 우리가 규칙적으로 산책을 한 후 어느 날 아침에 쓰러졌습니다. 그녀는 평소와 같이 일을 하다가 돌아오는 길에 웰컴 매트에 멈춰서 기절했습니다. 그녀가 멍한 상태에서 벗어나는 데는 영원 같았던 시간이 걸렸습니
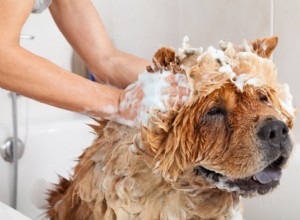
자주 목욕을 시키지 않으면 개에서 냄새가 날 수 있지만, 그것이 개를 목욕시켜야 하는 유일한 이유는 아닙니다. 목욕은 개의 털과 피부를 건강하게 유지하는 데 도움이 되며, 이는 강아지를 깨끗하고 먼지와 기생충으로부터 보호하는 데 도움이 됩니다. 개 목욕이 쉬워 보일 수 있지만 올바르게 하려면 몇 가지 고려해야 할 사항이 있습니다. 먼저 반려견의 불안을 예방할 수 있는 편안한 환경을 조성해야 합니다. 반려견의 목욕 시간을 즐겁게 해줄수록 규칙적인 목욕 시간이 더 쉬워집니다. 또한 개 알레르기를 유발하거나 개의 피부와 털을 건조하게